Wednesday, 30 July 2014

AIRTEL NEW DATA BUNDLE PLAN 2GB FOR 2000

NEW AIRTEL DATA PLAN, 2GB FOR 2OOO

For some weeks now, network providers have had series of meetings on how to provide a better and cheaper plan for andriod devices. Well, some of us have patiently waited for the conclusion of these meetings, and for some period of time didnt hear anything from any of them, It might interest you to know that theres a goodnews for all andriod users becasue Airtel has been the first network provider to bring out solutions partaining to this issue.

Just some days ago, aritel sent similar messages to its customers notifying them of the new development, the message looks like this;
(see image below)


Airtel has provided a data plan for andriod users, and this costs 2000 for just 2gb.. Some of us may say that this new data bundle plan is quite expensive, while others may say it is cheap just the way it is,depending on the individual in question and depending on what you subscribe to do For downloading machines, it is cost while chating machines can say its ok. Compared to some of the previous plans i have been using, i would say i still prefer the BLACKBERRY plan of 1500 for 2gb and also the BLACKBERRY offer of 1500 for 4gb plan. But the problem is that the 1500 for 2gb plan doesnt last long at all, within some days it must have already been exhasted weather you download or not, how can we be sure that the 2000 for 2gb plan will work just fine?
I have personally experienced this plan and i can assure you it is quite stronger than that of the BLACKBERRY plan, i have also heard others saying the same thing. So there's no need been afraid of this plan, its the BEST for now.

Lets cut to the chase, How can i subscribe to this plan?
After loading the recharge card on your mobile phone, all you need do is to dial the code as follows *141*200#... its that simple

After dailing the code, you will get a confirmation messages telling you your subscription has been successful, You can check your data bundle by using *123*9# or you can use *123*10#

Drop your testimonies, dont forget to like and share with your friends

Friday, 18 July 2014

BROWSERS - HOW TO CLEAR HISTORY FROM BROWSERS

All browsers keeps a browsing history of the pages/sites you as a user have visited and Chrome, opera mini, Torch and Mozilla Firefox are not an exception, this is so because for some obvious reasons you may want to re-visit those websites maybe because they contain information's that are of importance to you so the history makes it easy for you to go back and get utility. Firefox automatically saves all your visited sites under the history section in your browser.

HOW CAN I VIEW THE HISTORY OF MY BROWSER?

To see the history simply press down the CTRL key and press H.
(see image)

That of chrome is quite different from this, it fills the whole page as it has other features and options
 (see image)


From both pictures,  you will notice that there are lots of URL's from various websites, the presence of the history will help you access them easily. But there is something we need to know, like too much files in the recycle can reduce the speed of the computer so can the history reduce or increase the speed of the browser depending on how we treat the URL's in them. If you have few history or you often clear the history of your browser your browser will be faster than it was before.

HOW CAN I START THIS PROCESS?
 This is what we have been waiting for, well simply follow the procedures below;

1. Open the browser
2. Click on the Customize Chrome button, the button at top right, immediately under the close button
(see image for help)

3. Click on History or press Control + H
4. Click on clear browsing data
5. Select from the below pictures what you want to clear. Like browsing data, deleting cookies, Download data, passwords and others and then click on Clear  browsing data.

All browsing DATA will be removed after this process.

THANKS FOR READING, LIKE AND SHARE WITH YOUR FRIENDS, ALSO VISIT OUR YOUTUBE CHANNEL HERE.

Sunday, 13 July 2014

USING GLO BIS ON PC AND ANDROID DEVICES

HELP WITH GLO BIS ON PC

Well i discovered this has been a problem with most Blackberry users, they find it hard to use their BIS on PC after subscribing and to me its never a happy thing. Well this post will show you how to use it on Android and on PC as well..

For the android users who may have created a blackberry setting in their android phones, i will like to inform you that this will work depending on your area. Like mine, in UDU road its not working on my android but when i cross to town it starts working.. So if you have subscribed and we have same problem i will suggest you try other bundle plans from other network providers. If you have a blackberry and an Android phone then it will be easy for you to share the network across especially for those using blackberry hones with the HOTSPOT feature. The process of sharing to your android phones can also be applied to your PC as well.

As it may go some persons may still not have felt the real vibe thereby watching 3GB wasting away. There is a solution for blackberry owners who have PC's. For all you need to do is to get a software Blackberry desktop software otherwise called blackberry suit. With the aid of this software you can browse with your system while your blackberry acts as the modem.

How does this work? see below

1. First thing to do is to get this software installed in your system
2. Connect your blackberry
3. Open the software, when the program is opened you will see some details about the phone.
(see image)


4. Click on tools
5. Click on mobile network settings click on ADD CUSTOM PROFILE to create a new one


6. add user name and password and your APN as blackberry.net
(see image)


7. Click save
8. Click on tools again
9. Click on START MOBILE INTERNET

simply wait for it to connect and start browsing. Don't forget to like and share with your friends.
Drop your testimonies via commenting

Wednesday, 9 July 2014

FORMATTING USING WINDOWS AND DOS COMMAND

How to format a flash drive, memory card and other devices using any Windows.

The post will help you on how to format your flash drive, memory card and even your phones using the computer system. We may want to format these devices because they are filled up with files, infected with viruses, or they are

All you need to do is to insert the flash or device you want to format into the computer, then click on the START button, then click on My Computer on the start menu.

OR

 after inserting the flash, simply press WINDOWS+E to take you to my computer.
Then right click on the drive to be formatted, and click on format.

A format box will appear presenting you with direction to go about with the formatting processes.
(see image)

From the above image, there are some grammars we need to understand. they are;


1. Capacity of the drive: This depends on the drive you are formatting, most disks are 1.44Mb,as the case may be, if your not sure about it, the best option is to leave it at default..

2. The file system: FAT or NTFS, FAT is the normal file system for flash drives and memory cards. If you are not sure if its FAT or NTFS is the only option is to let it be FAT.

3. The volume babel: This acts as the name of identification of your drive, as a user all you need do is to input the name into the box.

4. Quick format: I love this option because it is stress free, it can be used when a drive has already been formatted and the user just want to remove all the files in it.

Most persons do not really look at all these before going ahead to format their dives, after the above processes have been arranged, then you can click on start format and click on OK..
(see image)

The formatting process will begin then, wait for this process to be completed. Nothing should made you remove the device that is been formatted while this process goes on as it could lead to the device developing a fault of not many faults. Sometimes, this could lead to the final damage of the device, especially when dealing with flash drives. It should look like this after the process is completed.
(see image)

IS possible to format drives using the COMMAND PROMPT? Lets see if its possible, I will show you.


After inserting the flash to be formatted
Click on the start button, click on run and type CMD then click OK(windows xp)
click on the windows button, type command prompt or CMD and click on it (windows 7)

The next thing to do is to know the drive your formatting. In my example, it is drive F.
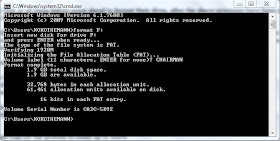
While in your command prompt, type FORMAT F: and press enter.

(see image)

Press any key after that and wait for the process to count up to 100%

(see image)

When it gets to 100%, it will prompt you for a Volume label, simply type the name you desire and press enter


Then type EXIT in the command prompt and press enter.
TELL US YOUR EXPERIENCE AFTER READING THIS POST!!!!

Saturday, 5 July 2014

MICROSOFT WORD - DESIGNING A BETTER LETTER HEADER

A letterhead is the heading at the top of a sheet of letter paper (stationery). That heading usually consists of a name and an address, and a logo or corporate design, and sometimes a background pattern. The term "letterhead" is often used to refer to the whole sheet imprinted with such a heading.
Many companies and individuals prefer to create a letterhead template in a word processor or other software application. This generally includes the same information as pre-printed stationery but without the additional costs involved. Letterhead can then be printed on stationery (or plain paper) as needed on a local output device or sent electronically. (Gotten from Wiki, read more)
 HOW CAN I CREATE ONE?

First and foremost, we open the program (MICROSOFT WORD). After opening you notice the program comes with an already created document file. A letter header can  be for either a company or an individual, but the method of creating remains the same..
What you quickly do is to create a new document, then set up your page in the way it will best suits you.
The below video will trill you on how to set up your page, You're free to watch

When you are done with the setting up of your page and your paper size and all that, the next thing to do is to insert your company or individual logo to the header section of your letterhead. It is very essential that the header and the footer are edited so it can be possible for you (the user) to add text to the template... But how can this be done ? All you need do is to click on insert and then select header which automatically comes with its footer.... After inserting the header and footer which usually comes together, all you need do is to insert the logo as said before. You can do this by clicking on insert and then click on pictures, then select the drive you have the logo, open the drive and select the picture and lastly click OK.. it should talk some seconds before opening.
When the picture is first uploaded to the program, its size can only be increased or decreased, but with the help of text wrapping you will be able to move the picture from one direction to another..
(SEE HOW TO TEXTWRAPP A PICTURE  IN WORD)

We have added the logo, it doesn't stop there, so lets proceed with adding the other components, It is expected that we select a desired font and also a good font size that will make the design look mature and then we then also have to add our Company's name, company's address, the services we render, a water mark if possible, our reference, the date and other information's related to the company...

When  your done with the design simply save it as a "read-only" file, you can do this by right-clicking on the file (after it has been saved). Click on properties, you will then see check boxes which control the file's attributes among which One of the check boxes will be "read-only", simply tick this box and then click OK, this will stop the file being overwritten by an user, your not an exception unless you temper with the above setting. If for one reason or the other the need arises for you to edit the template in the future, it can also be done by right-clicking the document , select properties, and un-check the read-only attribute check box.

An example is seen below

Thursday, 3 July 2014

MICROSOFT WORD - ADJUSTING PAGE MARGINS

To change the margins in Microsoft Word and/or setup the multiple page options, first you have to open the Page Setup dialogue box.
The steps may be different in your own version of Microsoft program, i am using MS OFFICE 2007
so we begin by Clicking on Page Layout> Page Setup> Margins> Custom Margins.
(see image)

As seen from the image above, there are numerous options for adjusting the margins of your document. Including changing the dimensions of the top, left, bottom and right margins, as well as set the size and position of the gutter..

Changing the size and position in Microsoft Word is very easy, you can either use the value adjuster, or by typing in the size of the margin required directly into the corresponding box. The gutter can be placed at the top of the document or the sides, The setting of the gutter margin allows your documents to be banded, by adding some extra space to the existing margin.
The gutter size is only adjustable if the Normal option is selected for Multiple Pages.. What you can do is to click on multiple pages and select a desired option..

There are a few things to learn while we are talking about this margin, well am going to tell you some of them, they are listed below;

1. Page Orientation
Around the Margins selection tab we can also find page orientation setting, which are the Portrait and Landscape,  The Portrait is most commonly used by computer operators for typing letters and documents and printing them as well, while the  Landscape orientation is commonly used for photographs, banners, flyers, books, booklets, large format tables and many other. A user can only select one at a time as both cannot be used.

2. Normal Setting
The normal is a default setting in Microsoft Word, ans it is suitable for only regular single-sided documents which will not to be bound.

3. Mirror margins
We also have Mirror margins, when a user clicks on this option , the page will be arranged with mirrored margins effect and this setting is one very useful setting, especially for documents facing each other. A point to note is this; when a user clicks on the mirror margins option, both sides of the margin sizes on the page setup becomes the inside and outside margin sizes.

4. Multiple Page Settings
This option allows the user to select certain page/print setups, including Normal, Mirror pages, 2 pages per sheet and Book fold.

For some reasons, users tends to select 2 column while creating a document, sometimes we call it 2 pages per sheet. Well this is not only a great way to save our paper, But it is somewhat helpful if the user in question is using an automated page numbering. This option will change the size of the margin labels in the page setup dialogue box. And so if a user chooses portrait as his/her orientation, both the top and button margin labels will become the outside and inside margin labels. While if a user select landscape as his/her orientation, this will change the left and right margin labels to outside and inside, now working opposite as the first instance.

As for Book fold as mentioned before, i love this option so much, as it is a great tool for printing booklets, this will also produce a similar result while using the 2 columns per sheet option with a landscape orientation, the slight difference is that Ms Word will add a fold line to the printed document.

Wednesday, 2 July 2014

MOVING EXCEL CHARTS TO POWER-POINT

If you do a lot of presentations in Microsoft power point, there is a possibility of coming across some large data reports that may include charts and graphs that summarize data for your audiences and bring about better understanding as well, and so adding charts and graphs may be something that will bother us at that moment.
It is somewhat difficult to copy and paste an entire chart from Excel into a power point slide, this is because the chart can be seen quite alright, but the entire worksheet will also be copied to the slide and so when you double-click on the copied chart, Microsoft power point instead of opening only the chart, it will go ahead and open the entire worksheet, thereby causing problems for the user.
It is not really likely for most users to password a presentation carried out in power point, but if this is the case then the computer user can easily adjust the data that was fed into the chart and easily corrupt accuracy.

Secondly, since the entire Excel workbook is copied into the PowerPoint file, this can dramatically increase the total size on the PowerPoint file, possibly making it too cumbersome for distribution.
One simple solution is to modify how the pasting into PowerPoint is done. Follow these steps:
In Excel, copy the chart as you normally would. (For instance, select the chart and press Ctrl+C.)

In PowerPoint, display the slide where you want the chart to appear.
Choose the Paste Special option from the Edit menu. PowerPoint displays the Paste Special dialog box.

Tuesday, 1 July 2014

4 Good Reasons Why You Should Format Your Computer

Lots of computer users at one time or the other may think about formatting their computers, there are many reasons for thinking of such, is can be because of the slight changes recently experienced
by us during the period of operating our computer and most times this is very strange to us..
If you recently purchased a new computer then this may not really bother you now because
recently developed computers comes with an already formatted hard drive and so you have nothing
to worry about, but this is also important to you as time goes on you may want to do likewise to
your computer. Simply put, formatting is the process of preparing the hard drive to be in its best
performance for your usage as well as removing all other contents that were present in it.. It is
usually done using an operating system disc, but users without the knowledge should not temper
with their computers because it can develop faults from there, and this may sometimes be
unrepairable... During the process of formatting, all installed programs, saved files and documents,
folders, gadgets and many more will be wiped off rendering the computer empty..
Formatting the computer will at times lead to the lost of some drivers, like sound card, VGA,
bluetooth, increase and decrease brightness, USB, and many others, these mentioned drivers can
be removed before formatting and installed back after formatting, we can use DRIVER
EXTRACTOR in this case, or after formatting we can use DRIVERS PACK to install missing drivers.
So you see making this decision in a hurry can lead to the loss of many things, hence it is very very
vital that we have some reasons in mind before making a decision of formatting our computer.
Although your lost files can be gotten back with software/software like RECOVA, but note that not
all your lost files can be recovered..

These are the possible reasons for formatting
1. Computer fails to boot to windows

There are times your computer fails to boot, without our notice we may decide to restart all over
and continue this process, but it may be that this is happening because our computer has been
infected with virus. Before now, you notice that any flash or hard drive inserted into your computer
are always left with shortcuts and all the files usually goes missing...
These viruses corrupt the data and make it difficult for the user to open the files or use the system
properly. They have the power to reduce the system efficiency because they stress the CPU and
prevent other programs from working. Users that are always Downloading cryptic files from the
Internet, using flash drives on our computer without checking for viruses in them via scanning, or
connecting to a public network will surely create problems for you, lol. Be smart and watch the files
your download, because running them in your computer will cause you great harm. It is possible
that there is a boot sector virus affecting your computer.. Apart from been infected with a virus, it
can also happen due to some changes in configuration, chances are that the system won’t start up or
boot because the operating system is not loading. In such circumstances, i strongly suggest your
format so that the new windows will come with the recommend settings and configurations as the
user would want.. Determining the problem may be time exhausting, so formatting can save time..

2. My hard drive is full

You may decide to format your computer due to the fact that your 320GB hard drive has filled up
and there is no much space to add more files and other programs.. We may want to remove all the
files by deleting them as well as uninstalling unwanted programs, but i prefer the formatting
because most of the occupied spaces in your hard drives may be files you do not even know about
but they are there, so formatting the computer will delete such files, and also it saves time, in about
45mins your done with the process. I advice that we still search or go through the computer so that
we can locate our important files and prepare for backing up our content..


3. For installing upgrades

Upgrading your computer's operating system is a natural reason to format your computer as every
users wants to the updated with the new interface. You may decide to get a an improved version of
the windows your using or get the latest version of windows (WINDOWS 7, 8 or 8.1)


4. Slowness of your PC

Computers are really like humans, that's why when an error is encounterd by the computer, the
speed of running is reduced, its like when we are sick with a fever, our joint hurts and we find it
difficult to eat, sleep and move around, this is exactly what the computer goes through, and this
results to the slowness.  Formatting can help you in this regard, but before formatting we may want
to try the system repairs provided by windows, after this is done and you still experience the same
thing then formatting can take place..
NOTE: whatever the case may be it is very essential that all our files are backed up to prevent
them from miss, RECOVA may only bring back some part of your files...

I STRONGLY ADVICE THAT YOU FORMAT YOUR COMPUTER IN EVERY 3 MONTHS TO
KEEP IT RUNNING, YOUNG, STRONG AND HEALTHY...
DON'T FORGET TO LIKE, SHARE AND INVITE YOUR FRIENDS